如今,许多基于神经网络的突破性解决方案每天都在开发,越来越多的人采用这项技术来解决诸如语音识别等生活中的问题。由于计算的最新进展以及在生产环境中使用神经网络的趋势不断增长,因此人们非常重视在大型生产环境中运行此类解决方案,理想情况下,还要在“边缘”实时运行。
假设您有一个在 PyTorch 中编写的经过良好训练的神经网络。您能做些什么来加速 CPU、VPU、集成显卡、FPGA 或其组合上的推理步骤?幸运的是,无需对任何源代码进行重大重新架构和重写,现在就可以轻松地使用英特尔 OpenVINO 工具包提供的推理引擎来加快推理步骤的性能。在许多情况下,您可以获得可观的性能提升,而无需大幅牺牲推理精度。此外,模型转换过程也很简单快捷。剧透警告:在我们的示例中,我们已经将推理步骤加速了大约 2.2 倍!
有关英特尔软件产品中性能和优化选择的更多信息,请参阅 https://software.intel.com/articles/optimization-notice。
那么这个 OpenVINO 工具包是什么呢?
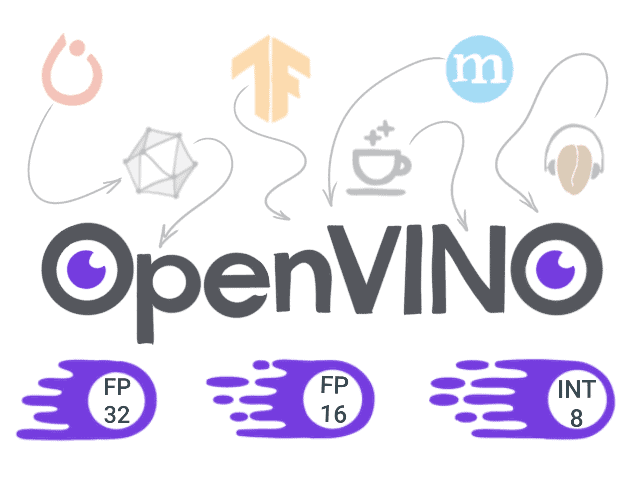
开放式视觉推理和神经网络优化 (OpenVINO) 工具包 是一套库、优化工具和信息资源,可以促进计算机视觉和深度学习软件的开发。当您想要最大限度地提高性能时,可以依靠它
或为英特尔平台优化您的应用程序。那么 OpenVINO 工具包内部有什么呢?
- 模型优化器 - 一个命令行工具,用于使用静态模型分析调整网络以实现最佳执行。模型优化器的结果是 中间表示 (IR),它可以与推理引擎一起启动。
- 推理引擎 - 一个 API,用于读取 IR、设置输入和输出,并在选定的设备上进行推理。
- OpenCV、OpenCL、OpenVX 和英特尔媒体 SDK。
您可以在此处找到更多信息:https://docs.openvinotoolkit.org/。
概述
为了演示它的工作原理,我们将选择一个有趣且相关的模型,并执行以下步骤
- 准备环境。
- 使用 PyTorch 训练模型(或使用预训练模型)
- 将 PyTorch 模型转换为 ONNX 格式。
- 使用 模型优化器,将模型从 ONNX 转换为 中间表示 (IR) 格式。
- 使用 推理引擎 进行推理,并比较性能和结果。
本文的所有源代码都可以在 GitHub 上找到。
1. 准备环境
- 安装 Python 3.6 或 3.7 并运行
python3 -m pip install -r requirements.txt
requirements.txt 内容
torch
numpy
onnx
networkx
- 使用官方 说明 安装 OpenVINO 工具包版本 2020.1 或更高版本。
代码已针对指定版本进行测试。但如果您已安装某些组件,也可以尝试在其他版本上运行它。
2. 在 PyTorch 中运行推理
我们选择了 FaceMesh 模型来进行我们的实验。我们将利用一个现成且经过训练的 实现。
该模型需要裁剪后的面部作为输入,因此我们还需要一个面部检测器。好消息是,英特尔已经将面部检测器转换为 IR 并将其放入 Open Model Zoo 中。Open Model Zoo 包含许多模型,包括文本检测和识别、姿态估计、分割、人员识别等。所有这些模型都已针对推理引擎进行了优化,可以开箱即用。
为了进行公平比较,我们将使用在 PyTorch 中的面部检测模型重新创建管道的前处理步骤,我们将将其转换为 OpenVINO。
对于此任务,我们将使用在此处实现的 BlazeFace 模型 here。作为第一步,让我们创建并运行一个推理脚本
import cv2
from facemesh import FaceMesh
from blazeface import BlazeFace


# load FaceMesh model
mesh_net = FaceMesh()
mesh_net.load_weights("facemesh.pth")

# load BlazeFace model
blaze_net = BlazeFace()
blaze_net.load_weights("blazeface.pth")
blaze_net.load_anchors("anchors.npy")


# postprocessing for face detector
def get_crop_face(detections, image):
    w, h = image.shape[0], image.shape[1]

    ymin = int(detections[0, 0] * w)
    xmin = int(detections[0, 1] * h)
    ymax = int(detections[0, 2] * w)
    xmax = int(detections[0, 3] * h)

    margin_x = int(0.25 * (xmax - xmin))
    margin_y = int(0.25 * (ymax - ymin))

    ymin -= margin_y
    ymax += margin_y
    xmin -= margin_x
    xmax += margin_x

    face_img = image[ymin:ymax, xmin:xmax]
    face_img = cv2.cvtColor(face_img, cv2.COLOR_BGR2RGB)
    image = cv2.rectangle(image, (xmin, ymin), (xmax, ymax), (0, 0, 255), 2)

    return xmin, ymin, face_img


# postprocessing for mesh
def get_mesh_face(detections, face_img, image, xmin, ymin):
    xscale, yscale = 192 / face_img.shape[1], 192 / face_img.shape[0]
    for i in range(detections.shape[0]):
        x, y = int(detections[i, 0] / xscale), int(detections[i, 1] / yscale)
        image = cv2.circle(image, (xmin + x, ymin + y), 1, (255, 0, 0), 1)


videoCapture = cv2.VideoCapture(0)
while True:
    ret, image = videoCapture.read()
    if not ret:
        break

    # preprocess image
    face_img = cv2.cvtColor(image, cv2.COLOR_BGR2RGB)
    face_img = cv2.resize(face_img, (128, 128))

    # get face detection boxes
    detections = blaze_net.predict_on_image(face_img).numpy()
    xmin, ymin, face_img = get_crop_face(detections, image)

    # get face mesh
    mesh_img = cv2.resize(face_img, (192, 192))
    detections = mesh_net.predict_on_image(mesh_img).numpy()
    get_mesh_face(detections, face_img, image, xmin, ymin)

    # show processed image
    cv2.imshow("capture", image)

    if cv2.waitKey(3) & 0xFF == 27:
        break
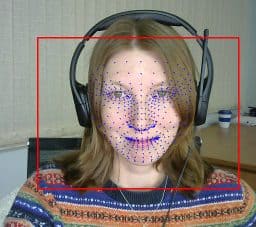
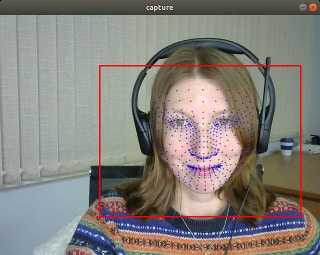
结果看起来不错!你觉得怎么样?

使用 PyTorch 的 FaceMesh 结果。请注意,网格绘制在从场景中识别出的面部上,并且特征已对齐。
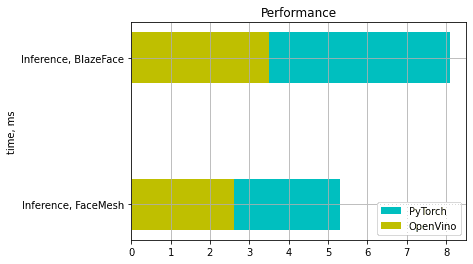
现在让我们测量性能。我们得到 FaceMesh 的 5.3 毫秒和 BlazeFace 的 8.1 毫秒。
我们只测量和比较推理时间。
测量是在以下环境中进行的:Ubuntu 18.04.3,英特尔酷睿 i7-8700 CPU @ 3.20GHz。
3. 将 PyTorch 模型转换为 ONNX 格式
ONNX(开放式神经网络交换)是一种用于表示来自不同框架的模型的开放格式。
要转换 PyTorch 模型,您需要 torch.onnx.export 函数,该函数需要以下参数:预训练模型本身、大小与输入数据相同的张量、ONNX 文件的名称以及输入和输出名称。
net = BlazeFace()
net.load_weights("blazeface.pth")
torch.onnx.export(net, torch.randn(1, 3, 128, 128, device='cpu'), "blazeface.onnx",
    input_names=("image", ), output_names=("preds", "confs"), opset_version=9
)
net = FaceMesh()
net.load_weights("facemesh.pth")
torch.onnx.export(net, torch.randn(1, 3, 192, 192, device='cpu'), "facemesh.onnx",
    input_names=("image", ), output_names=("preds", "confs"), opset_version=9
)
要检查模型是否已成功转换,我们可以调用 onnx.checker.check_model 函数,如下所示
onnx_model = onnx.load(ONNX_FILE_PATH)
onnx.checker.check_model(onnx_model)
您可以在 此处 找到支持的操作列表,并且它不断扩展。
4. 将模型从 ONNX 转换为 **中间表示**
现在是启动 模型优化器 的时候了。在我们的案例中,我们将从 ONNX 转换模型,但这并不是唯一支持的格式。
如果您有 Caffe、TensorFlow、MXNet 或 Kald 中的模型,也可以使用它们。
在开始使用 OpenVino 工具包之前,您应该始终通过以下命令激活 OpenVINO 环境
source <path_to_openvino>/bin/setupvars.sh
如果一切顺利,您将看到
[setupvars.sh] OpenVINO environment initialized
运行转换


python3 <path_to_openvino>/deployment_tools/model_optimizer/mo.py --input_model [facemesh or blazeface].onnx
结果是,您将获得两个文件,它们描述了您模型的优化版本
– *.xml – 包含有关网络拓扑的信息
– *.bin – 包含权重
不幸的是,并非所有 ONNX 层都受支持。可以在 此处 找到受支持层的列表。
5. 使用 推理引擎 运行推理
要使用 OpenVino 运行推理,我们必须在 IR 中初始化并加载网络,准备输入数据并调用 infer 函数。
然后我们可以获取对结果的解释。因此,最小脚本将如下所示
from openvino.inference_engine import IECore
from openvino.inference_engine import IENetwork

ie = IECore()
net = IENetwork(model=model_path_xml, weights=model_path_bin)
exec_net = ie.load_network(network=net, device_name="CPU")

input_blob = next(iter(net.inputs))
result = exec_net.infer({input_blob: preprocessed_image})
在我们的特定示例中,我们应该看看如何使用 PyTorch 对 FaceMesh 和 BlazeFace 进行预处理,并使用 OpenCV 函数 cv2.dnn.blobFromImage 重复此过程。我们还需要重现后处理。对于 FaceMesh,这非常容易(参见下面的代码),但对于 BlazeFace,我们必须重新实现诸如 IOU、NMS 等操作。为此,我们可以使用 blazeface.py 脚本,并将使用 PyTorch 张量的操作替换为使用 Numpy 数组的对应操作。
最终脚本将如下所示
import cv2
import numpy as np
from openvino.inference_engine import IECore
from openvino.inference_engine import IENetwork
from blazeface import BlazeFace


def load_to_IE(model):
    # Loading the Inference Engine API
    ie = IECore()
    # Loading IR files
    net = IENetwork(model=model + ".xml", weights=model + ".bin")
    # Loading the network to the inference engine
    exec_net = ie.load_network(network=net, device_name="CPU")

    return exec_net


def do_inference(exec_net, image):
    input_blob = next(iter(exec_net.inputs))
    return exec_net.infer({input_blob: image})

# load BlazeFace model
blaze_net = load_to_IE("model/blazeface")
# load FaceMesh model
mesh_net = load_to_IE("model/facemesh")

# we need dynamically generated key for fetching output tensor
blaze_outputs = list(blaze_net.outputs.keys())
mesh_outputs = list(mesh_net.outputs.keys())

# to reuse postprocessing from BlazeFace
blazenet = BlazeFace()
blazenet.load_anchors("anchors.npy")


videoCapture = cv2.VideoCapture(0)
while True:
    ret, image = videoCapture.read()
    if not ret:
        break

    # get face detection boxes------------------------------------------------------------------
    # preprocessing
    face_img = cv2.dnn.blobFromImage(image, 1./127.5, (128, 128), (1, 1, 1), True)
    # inference
    output = do_inference(blaze_net, image=face_img)
    # postprocessing
    boxes = output[blaze_outputs[0]]
    confidences = output[blaze_outputs[1]]
    detections = blazenet._tensors_to_detections(boxes, confidences, blazenet.anchors)
    detections = np.squeeze(detections, axis=0)
    # take boxes
    xmin, ymin, face_img = get_crop_face(detections, image)

    # get face mesh ----------------------------------------------------------------------------
    # preprocessing
    mesh_img = cv2.dnn.blobFromImage(face_img, 1./127.5, (192, 192), (1, 1, 1), True)
    #inference
    output = do_inference(mesh_net, image=mesh_img)
    # postprocessing
    detections = output[mesh_outputs[1]].reshape(-1, 3)
    # take mesh
    get_mesh_face(detections, face_img, image, xmin, ymin)

    # show processed image
    cv2.imshow("capture", image)

    if cv2.waitKey(3) & 0xFF == 27:
        break
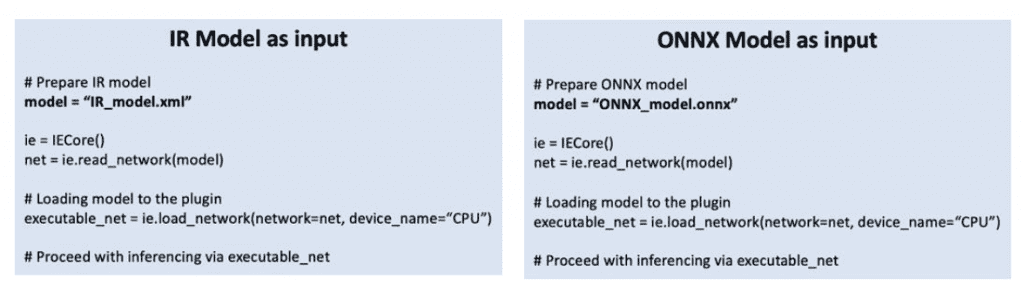
对于希望充分利用英特尔 OpenVINO™ 工具包的性能和功能的用户,建议遵循使用模型优化器中的中间表示作为推理引擎输入的本机工作流程。
对于希望快速开始使用已以 ONNX 格式训练的模型(例如,PyTorch)的用户,现在可以直接将该 ONNX 模型输入到推理引擎中,以在英特尔架构上运行模型。
让我们检查结果,并确保它们与之前在 PyTorch 中获得的结果相匹配。
比较性能
让我们测量性能。我们得到 FaceMesh 的 2.6 毫秒和 BlazeFace 的 3.5 毫秒。
总的来说,我们的设置获得了大约 2.2 倍的加速。
有关英特尔软件产品中性能和优化选择的更多信息,请参阅 https://software.intel.com/articles/optimization-notice。
总结和最终思考
今天,我们研究了如何将模型转换为 IR,以及哪些模型可以转换。我们在没有明显降低预测质量的情况下,实现了有效的(~2.2)加速。最重要的是,我们在使用相同的英特尔硬件时,无需对我们的解决方案进行重大重写或重新设计,就获得了这些结果。基本上,我们毫不费力地获得了“加速”!
有关英特尔软件产品中性能和优化选择的更多信息,请参阅 https://software.intel.com/articles/optimization-notice。
测试日期:2020 年 9 月 21 日
完整系统配置详细信息:Ubuntu 18.04.3,英特尔酷睿 i7-8700 CPU @ 3.20GHz × 12
设置详细信息:OpenVINO 工具包版本 2020.1
测试人员:Julia Bareeva,OpenCV.AI
贡献 - 如果您对如何改进产品有任何想法,我们欢迎您为开源的 OpenVINO™ 工具包 做出贡献。
想了解更多信息?加入 英特尔社区论坛中的对话,讨论所有关于深度学习和 OpenVINO™ 工具包的事宜。
英特尔致力于尊重人权并避免参与侵犯人权的行为。请参阅英特尔的 全球人权原则。英特尔的產品和軟件僅供在不造成或促成違反國際公認人權行為的應用程序中使用。
英特尔、英特尔标识和其他英特尔标志是英特尔公司或其子公司的商标。
OpenCV 内容合作伙伴关系
本文由 OpenCV 团队成员为英特尔撰写,作为 OpenCV 内容合作伙伴计划的一部分。该计划允许公司赞助与 OpenCV 用户相关的文章。这些文章将与我们的时事通讯订阅者和我们的社交媒体订阅者共享。